

"Alien: Romulus": Ab 24. April 2026 bei Amazon und im Leonine Studios Shop auf UHD Blu-ray im Steelbook - UPDATE 3"Scream" von Wes Craven: Im Februar 2026 wieder auf Ultra HD Blu-ray im Steelbook erhältlich - UPDATE"Ein fast perfekter Antrag" mit Iris Berben und Heiner Lauterbach: Ab 26.02. im Kino und im Juli 2026 auf Blu-ray2026 von Warner Home Video auf UHD Blu-ray: Vorschau auf kommende 4K-Premieren"Wrong Turn - The Foundation" ab 21.12. auf UHD Blu-ray im Mediabook mit Sammelschuber vorbestellbarSTC-Medienpool übernimmt Vertrieb von MaRuMi FilmMotion"Dogma": Kult-Komödie erscheint auch in Deutschland auf Ultra HD Blu-ray"Turbine Weihnachtsrakete 2025": Letzte Phase mit Rabatten von bis zu 44% gestartet"Capelight Adventskalender"-Tag 19: "3 für 33€"-Aktion mit Klassikern auf UHD Blu-ray in Keep CasesHeute neu auf Blu-ray Disc: "Kung Fu in Rome", "Prange - Man ist ja Nachbar", "Hush - Still" in 4K und mehr
NEWSTICKER
Blu-ray Forum → Gaming → PlayStation 3 → PS3 Hardware / Zubehör / Online
PS3 Themes selber machen!!
Gestartet: 20 Mai 2009 01:37 - 3 Antworten
#1
Geschrieben: 20 Mai 2009 01:37
Gast
So habe was nettes gefunden
(hoffe wurde nicht schon gepostet hatte such funktion benutzt vorab)
(hoffe wurde nicht schon gepostet hatte such funktion benutzt vorab)
PS3 Theme Builder by SBCroix
Tutorial by jpang
Download: PS3 Theme Builder 3.0 Upgrade (From v2.5, 5.32 MB)
Download: PS3 Theme Builder 2.5 Full Install (12.22 MB)
Download: Sample Theme Files (2.0 MB)
Download: Updated p3tcompiler (Includes 2.40 sample theme files, 5.0 MB)
Open up PS3 Theme Builder and click New Theme (Ctrl + N). A window will pop up like the one below:
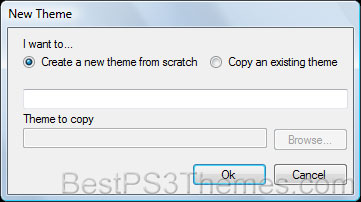
Choose either “Create a new theme from scratch” or “Copy an existing theme” and enter the theme name in the field below. This is what the theme file will be saved as.
Selecting “Copy an existing theme” will duplicate the theme .XML file you browse for (such as sample.xml contained in the sample theme files from above).
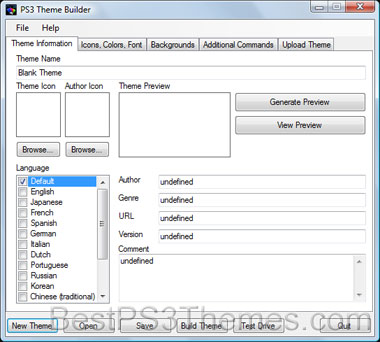
For this tutorial, select “Create a new theme from scratch” and name it whatever you want. Click Ok.
Afterwards, it should look like this:
Tutorial by jpang
Download: PS3 Theme Builder 3.0 Upgrade (From v2.5, 5.32 MB)
Download: PS3 Theme Builder 2.5 Full Install (12.22 MB)
Download: Sample Theme Files (2.0 MB)
Download: Updated p3tcompiler (Includes 2.40 sample theme files, 5.0 MB)
Open up PS3 Theme Builder and click New Theme (Ctrl + N). A window will pop up like the one below:
Choose either “Create a new theme from scratch” or “Copy an existing theme” and enter the theme name in the field below. This is what the theme file will be saved as.
Selecting “Copy an existing theme” will duplicate the theme .XML file you browse for (such as sample.xml contained in the sample theme files from above).
For this tutorial, select “Create a new theme from scratch” and name it whatever you want. Click Ok.
Afterwards, it should look like this:
-
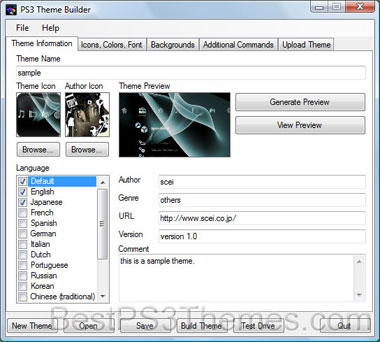
In Theme Name at the top, enter the name of the theme again. This is the name that will appear on the PS3
-
For Author, enter your name (who credit should be given to)
-
For Genre, enter the type of theme (Abstract/Art/Design, Cars/Transportation, Games, etc.)
-
For URL, enter a website, preferably http://www.bestps3themes.com
-
For Version, put the version of the theme
-
In the comment field, enter a description for the theme
Leave Default checked for the
Language part. If you want your theme to support multiple
languages, select and check any other languages and enter the above
information again. If the theme only supports one language, leave
only Default checked.
Here’s an example of what it
should look like now:
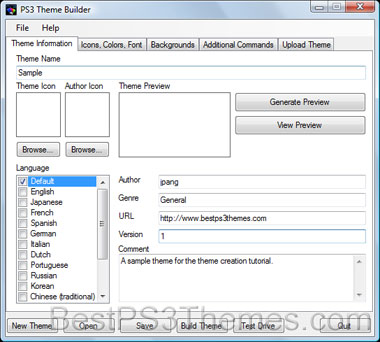
(Please don’t name your theme sample!)
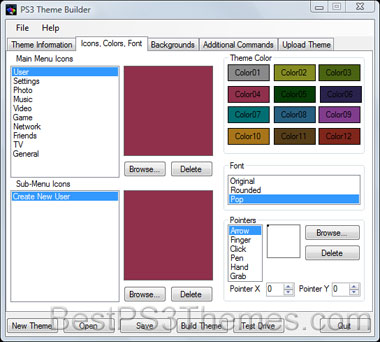
Now switch to the Icons, Colors, Fonts tab on top.
(Please don’t name your theme sample!)
Now switch to the Icons, Colors, Fonts tab on top.
-
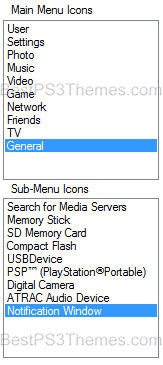
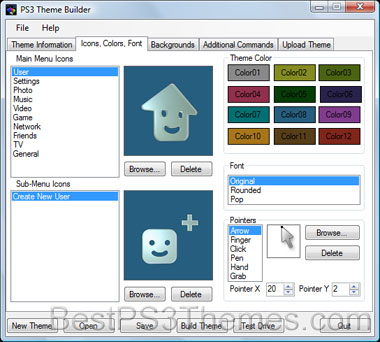
After you have created or downloaded some icons, you will have to match them up with the corresponding icon. Which icon is which is pretty self-explanatory. Any icon left blank will appear as the original one. Icons must be 128×128 pixels in PNG 32-bit format.
Main Menu icons:
Sub-Menu icons:
Sub-Menu icons:
-
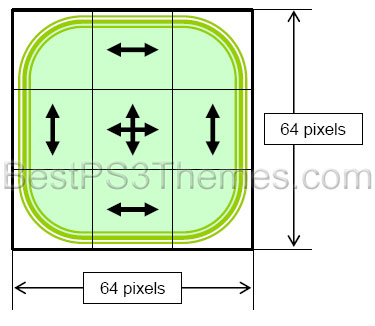
The frame of the notification window that is displayed at the upper right section of the screen when you receive a message, sign in/sign out, etc., can also be customized.
-
The size of the notification window will change depending on what’s being displayed inside. Use the below image to help prepare your notification window. Image must be 64×64 pixels in PNG 32-bit format.
-
For Theme Color, click the color that you want to appear when no wallpaper is set (default wave). Brown (color 11) is shown above.
-
For Font, choose between Original, Rounded, or Pop
-
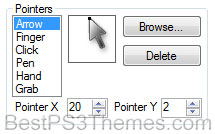
For each of the pointers (optional), browse for a custom pointer icon. Pointers must be 48×48 pixels in PNG 32-bit format. Then adjust the Pointer X and Pointer Y coordinates to that the black square lines up with the tip of the arrow.
-
There are six pointer states:
-
Arrow - Normal state
-
Finger - On an object that can be clicked
-
Click - Clicking
-
Pen - On an object where text can be inputted
-
Hand - On an object that can be dragged
-
Grab - Dragging
-
When you’re done with this part,
here’s another example of what it should look like:
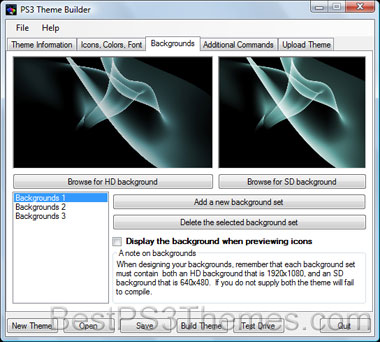
Switch to the Backgrounds tab, you’re almost done.

Switch to the Backgrounds tab, you’re almost done.
-
Click “Add a new background set” for however many backgrounds you want. You can have up to 16. If you have no backgrounds, the default wave will be shown. When there are multiple background images, images will switch randomly.
-
After you add your background sets, click “Browse for HD background” and select the wallpaper you wish to use.
-
Do the same for “Browse for SD background”
-
Repeat the above two steps for each background set you added
For each background image, both an
HD resolution and SD resolution background is required. The
appropriate image sizes are as follows:
-
For HD resolution: 1920×1080
-
For SD resolution: 640×480
Images must be in JPEG format,
under 1 MB otherwise the background may not appear.
Here’s an example of it now (3
background sets shown):
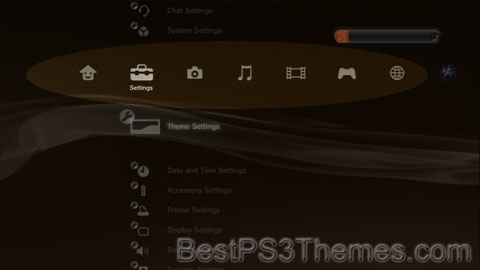
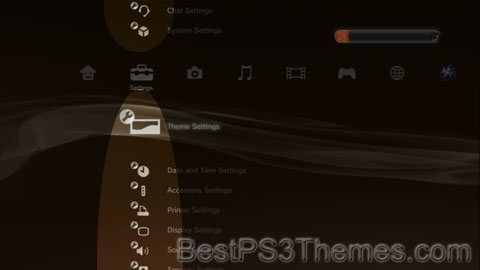
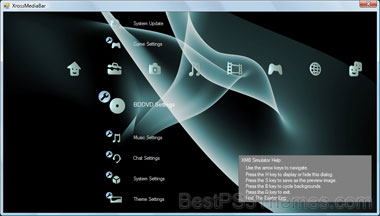
To make sure the icons and backgrounds are correct, click the Test Drive button at the bottom to simulate the PS3 XMB. A window like this will pop up.
To make sure the icons and backgrounds are correct, click the Test Drive button at the bottom to simulate the PS3 XMB. A window like this will pop up.
Switch back to the Theme
Information tab when you’re done test driving it.
-
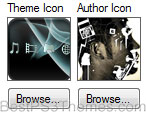
Under Theme Icon, browse for a theme icon. This is the icon that will appear in front of the name before you select the theme on the PS3.
-
Additionally, you may supply an Author Icon (optional). This will appear when viewing theme information on the PS3.Example:
-
Next, click Generate Preview. A window like this should pop up:
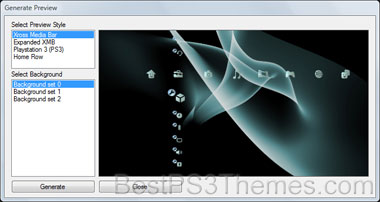
Then select the preview style you
want to appear in the preview image. Choose between Xross Media
Bar, Expanded XMB, Playstation 3 (PS3), or Home Row. The image on
the right side of the window will give you an idea of what each
style looks like.
If you’re using backgrounds, select the background set that you want to appear in the preview. Now click Generate at the bottom.
Another window should pop up:
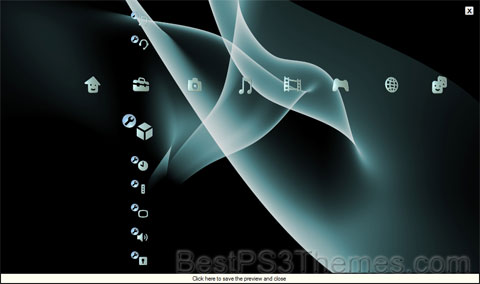
Click the bottom where it says, “Click here to save the preview and close.” The window will close and bring you back to the Generate Preview window. Close this one, too.
Now you should be back at the Theme Information tab. Save the theme, then click Build Theme at the bottom.
If all goes well it should say
done.
Press key...
If you’re using backgrounds, select the background set that you want to appear in the preview. Now click Generate at the bottom.
Another window should pop up:
Click the bottom where it says, “Click here to save the preview and close.” The window will close and bring you back to the Generate Preview window. Close this one, too.
Now you should be back at the Theme Information tab. Save the theme, then click Build Theme at the bottom.
If all goes well it should say
done.
Press key...
Congratulations, the theme is now
complete! Open up the PS3ThemeBuilderV2.13 folder, then go to the
Themes folder. Open up the next folder (It should be the name of
your theme) and inside there will be a .p3t file (the PS3 theme
file).
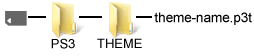
You will need to install this theme to your PS3. Use the below instructions.[LIST=1]
[*]
Prepare a storage media such as a
Memory Stick Duo or a USB device.
[*]
Create a folder named “PS3″
(without the quotes) on the storage media and create a subfolder
named “THEME” (must be all uppercase, again, without the quotes)
within that folder.
[*]
Copy the theme you created (.p3t)
to the “THEME” subfolder on the storage media.
Insert the storage media in the PS3 system.
In the XMB (Xross Media Bar), go to
 (Settings) >
  (Theme Settings) > [Theme], and then
select [Install].
(Theme Settings) > [Theme], and then
select [Install].Select the theme that you just created.
After installation has been completed, go to
(Settings) > (Theme Settings) > [Theme] again,
and then select the theme.#2
Geschrieben: 20 Mai 2009 01:51
RBlade
Blu-ray Starter
Simmerath
Forenposts: 85
seit 20.04.2009
seit 20.04.2009
Sony KD-65XF9005
Microsoft Xbox One X
X1 Spiele:
zuletzt kommentiert:
bluray-disc.de verlost 3 x „Eiffel in Love“ auf Blu-ray Disc
bluray-disc.de verlost 3 x „Eiffel in Love“ auf Blu-ray Disc
zuletzt bewertet:
Bad Moms 2
Bad Moms 2
Bedankte sich 4 mal.
Das hört sich ja mal interssant an ;)
schon mal jemand was mit dem Proggi gemacht?
wenn ja, darf ich mal schauen? *gg*
greetz
schon mal jemand was mit dem Proggi gemacht?
wenn ja, darf ich mal schauen? *gg*
greetz
#3
Geschrieben: 20 Mai 2009 06:37
fReAkMB
Blu-ray Starter
Mannheim
Forenposts: 160
Clubposts: 1
seit 12.04.2009
Clubposts: 1
seit 12.04.2009
Samsung LE-32S71B
Sony PlayStation 3
Blu-ray Filme:
PS 3 Spiele:
Steelbooks:
10
zuletzt kommentiert:
Verlosung: Der Herr der Ringe - Trilogie
Verlosung: Der Herr der Ringe - Trilogie
zuletzt bewertet:
Inception (Star Selection)
Inception (Star Selection)
Bedankte sich 7 mal.
Na die App werde ich mir wohl heute auch mal anschauen....


#4
Geschrieben: 20 Mai 2009 10:39
Gast
ich habe es gestern abend test halber gemacht, und kann nur sagen
es geht, man muss sich nur wie bei jeden programm einfinden. ich
teste auch noch ein anderes(gibt wohl einige) um halt das beste
rauszusuchen, aber finde das eine tolle sache :-)
Tipp: schaut bei youtube auch mal nach gibt einfach ps3 themes ein :-)
viel fun :-)
Tipp: schaut bei youtube auch mal nach gibt einfach ps3 themes ein :-)
viel fun :-)
Blu-ray Forum → Gaming → PlayStation 3 → PS3 Hardware / Zubehör / Online
Es sind 116 Benutzer und 19777 Gäste online.
-
Newsletter
Preisüberwachung
Bestellservice
Blu-ray Preise
PS4 Preise
PS5 Preise
XBox One Preise
XBox Series X Preise
-
Gewinnspiele
Umfragen
Blu-ray Blog
Merch-Shop
Banner
Partner
Jobs
-
Kontaktformular
Facebook
X
Mediadaten
Impressum
Mitwirkende
AGB
Datenschutz
Datenschutz Optionen
-
0 Mitglieder0 Gäste
-
Blu-ray News
 RSS Feeds
Blu-ray Deals
Blu-ray Reviews